Use Python to build your own blockchain step by step
Will you be as interested in the blockchain technology underlying the encrypted digital currency, especially if you want to know how they operate.
However, the learning blockchain technology is not easy. I have seen a lot of video tutorials and various courses. The final feeling is that there are too few practical courses available.
I like to learn in practice, especially like a code to understand the whole working mechanism. If you and I like this learning style, you will know how blockchain technology works when you finish this tutorial.
Written before the startRemember that a blockchain is an immutable, ordered chain of records called blocks. They can contain transactions, files or any data you like. But what's important is that they are linked together with hashes.
If you are not familiar with hashing, here is an explanation.
What is the purpose of the guide? You can read and write the basic Python comfortably, as we will discuss it with the blockchain via HTTP, so you also need to understand how HTTP works.
What do I need to prepare? Make sure to install Python 3.6+ (and pip), you also need to install the Flask, Requests library:
`pip install Flask==0.12.2 requests==2.18.4`
By the way, you also need a client that supports HTTP, such as Postman or cURL, others can.
Where is the source code? Can click here
Step 1: Create a blockchain
Open your favorite text editor or IDE, I personally prefer PyCharm. Create a new file called blockchain.py. We will only use this one file. But if you are still not sure, you can also refer to the source code.
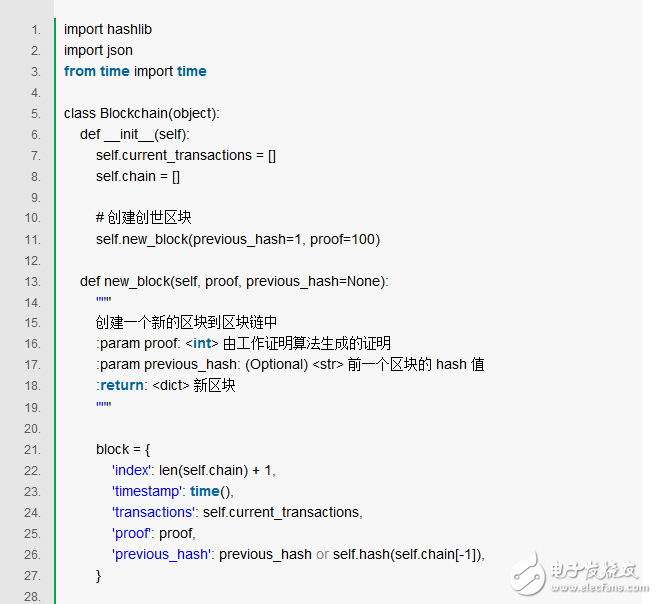
Describe the blockchainWe are going to create a Blockchain class whose constructor creates an initialized empty list (to store our blockchain) and another store transaction. Here is an example of our class:
Blockchain.py

Our Blockchain class is responsible for managing chained data, it stores transactions and there is a Method to add new blocks to chained data. Let's start to expand more Method
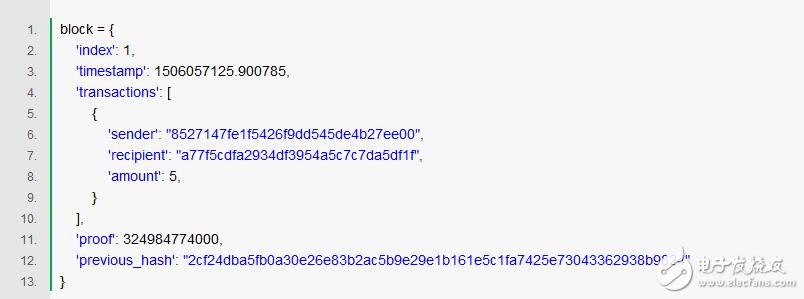
What is the block like?
Each block has an index, a timestamp (Unix timestamp), a list of transactions, a check (detailed later), and a hash of the previous block.
Here is an example of a Block:
Blockchain.py
At this point, the concept of a blockchain should be obvious - each new block contains a hash of the previous block within it. This is crucial because this is why the blockchain cannot be changed: if an attacker corrupts an earlier block in the blockchain, all subsequent blocks will contain incorrect hash values.
Does this make sense? If you haven't figured it out yet, take a moment to think about it - this is the core idea behind the blockchain.
Add a transaction to a block
We will need a way to add transactions to the block. The responsibility of our new_transacTIon() method is this, and it's very simple:
Blockchain.py
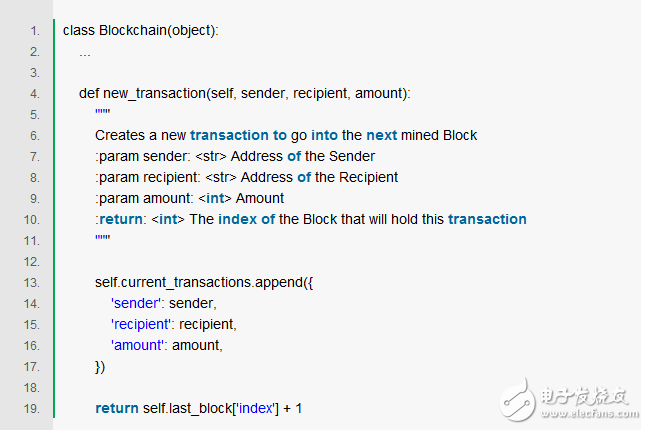
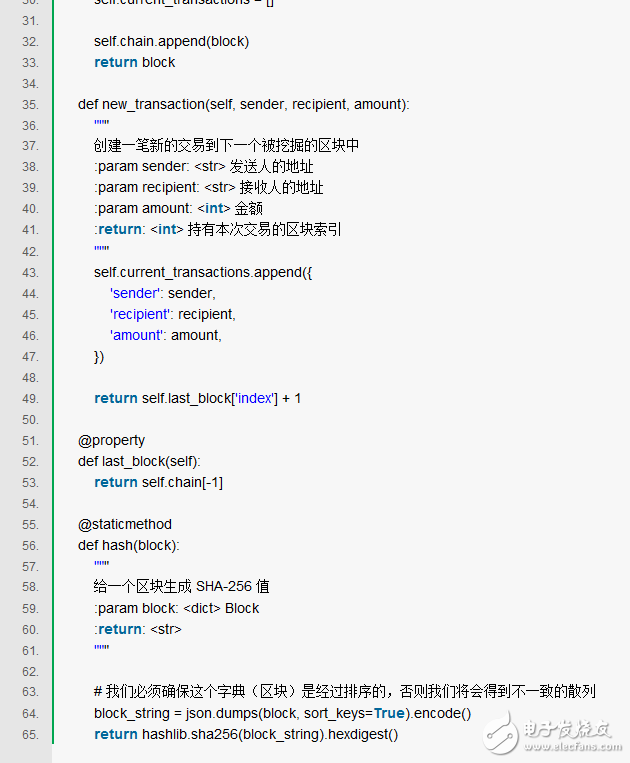
The new_transacTIon() method adds a transaction to the list, which returns the index of the block to which the transaction will be added --- mining the next one that is useful later for users who submit the transaction.
Create a new blockWhen our Blockchain is instantiated, we need to add the creation block (a block with no leading blocks). We also need to add a proof to our source block, which is the result of the mining (or proof of work). We will discuss mining in detail later.
In addition to creating the creation block in the constructor, we also complete the new_block() , new_transacTIon() , and hash() functions:
Blockchain.py
The above code should be straightforward -- I added some comments and documentation to make the code clear. We have almost completed our blockchain. But at this time you must be wondering how the new block was created, forged or excavated.
Workload proof algorithmUse the Workload Proof (PoW) algorithm to demonstrate how to create or mine new blocks on the blockchain. The goal of PoW is to calculate a number that meets certain criteria that must be computationally difficult for everyone, but easy to verify. This is the core idea behind the proof of work.
We will see a simple example to help you understand:
Suppose the hash value of a product of an integer x multiplied by another integer y must end with 0, which is hash(x * y) = ac23dc. .0. Let x = 5, find y? Implemented in Python:
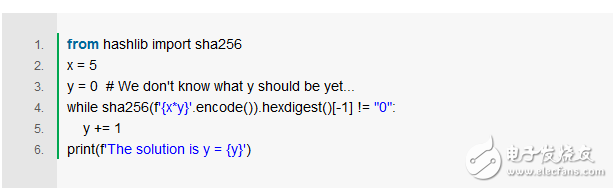
The result is: y = 21. Because the generated hash value must end with 0.
Hash(5 * 21) = 1253e9373e. .5e3600155e860
In Bitcoin, the workload proof algorithm is called Hashcash, which is similar to the above problem, but the calculation is very difficult. This is the problem that miners are vying for in order to compete for the right to create blocks. Usually, the computational difficulty is proportional to the number of specific characters that the target string needs to satisfy. After the miner calculates the result, he will receive a certain amount of bitcoin rewards (through the transaction).
It is of course very easy to verify the results.
Achieve proof of workloadLet's implement a similar PoW algorithm. The rules are similar to the above example:
Find a number P so that the Hash value of the string spliced ​​into the proof of the previous block starts with 4 zeros.
Blockchain.py

The way to measure the complexity of the algorithm is to modify the number of zeros at the beginning. Using 4 for the demo, you will find that one more zero will greatly increase the time required to calculate the result.
Now that the Blockchain class is almost complete, it uses HTTP requests to interact.
Step 2: Blockchain as an API interface
We'll use the Python Flask framework, a lightweight web application framework that makes it easy to map web requests to Python functions. Now let's make Blockchain run on a Flask web.
We will create three interfaces:
/transacTIons/new Create a transaction and add it to the block
/mine tells the server to mine new blocks
/chain returns the entire blockchain
Create nodeOur "Flask Server" will act as a node in the blockchain network. Let's add some framework code first:
Blockchain.py
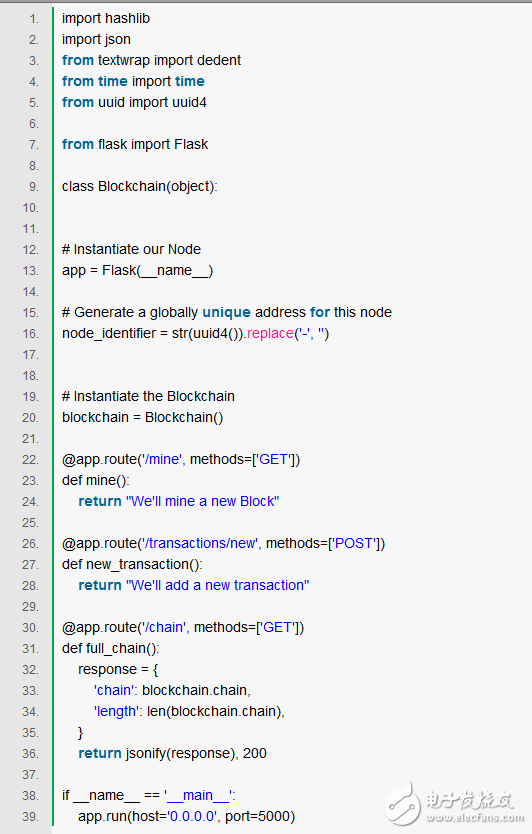
Briefly explain the above code:
Line 15: Instantiate the node. Read more about Flask content.
Line 18: Create a random name for the node. .
Line 21: Instantiate the Blockchain class.
Lines 24-26: Create /mine interface, GET mode request.
Lines 28-30: Create the /transactions/new interface, POST mode request, which can send transaction data to the interface.
Lines 32-38: Create the /chain interface and return the entire blockchain.
Lines 40-41: The server is running port 5000.
Send transactionThe transaction data structure sent to the node is as follows:
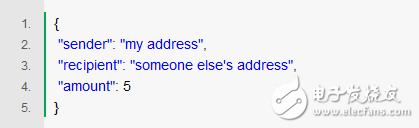
Because we already have a way to add transactions, it's easy to add transactions based on interfaces. Let's write a function for adding a transaction:
Blockchain.py

Mining is the magic, it is very simple, do three things:
Calculate the workload proof PoW
Grant a coin to the miner (self) by adding a new transaction
Construct a new block and add it to the chain
Blockchain.py
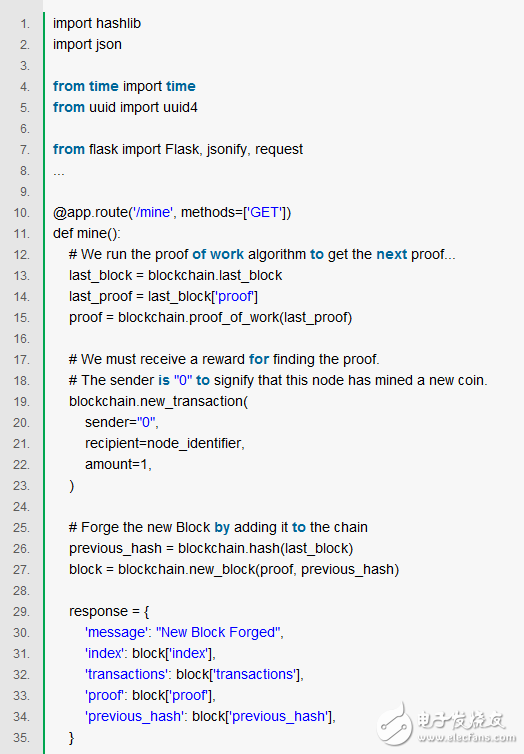
Return jsonify(response), 200
Note that the receiver of the transaction is our own server node, and most of the work we do is just to interact around the Blockchain class method. At this point, our blockchain is complete, we will actually run.
Step 3: Run the blockchain
You can use cURL or Postman to interact with the API.
Start the server:
$ python blockchain.py * Running on http://127.0.0.1:5000/ (Press CTRL+C to quit)
Let's do the mining by requesting http://localhost:5000/mine ( GET ):
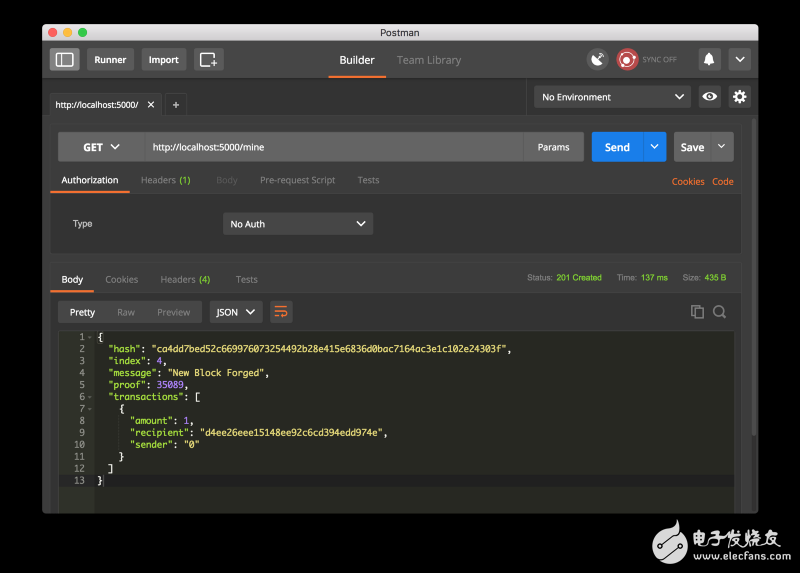
Initiate a GET request with Postman.
Create a transaction request and request http://localhost:5000/transactions/new (POST), as shown in the figure
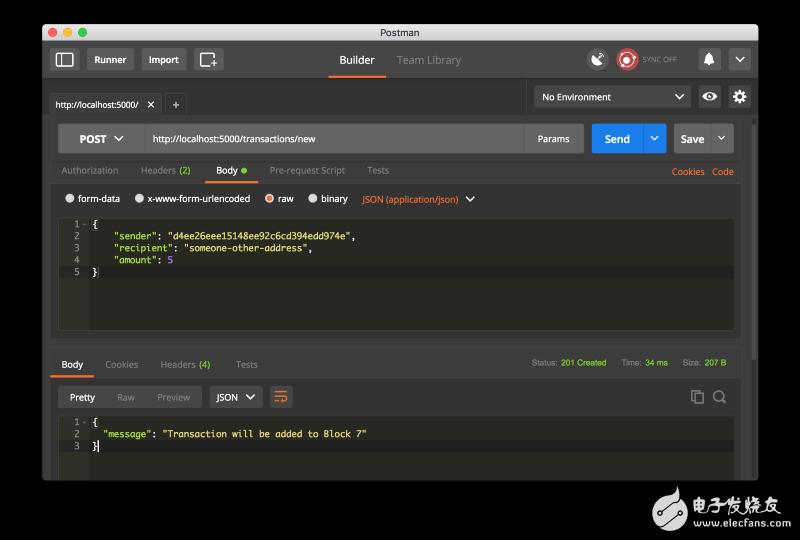
If you are not using Postman, the same cURL statement is used:
$ curl -X POST -H "Content-Type: application/json" -d '{ "sender": "d4ee26eee15148ee92c6cd394edd974e", "recipient": "someone-other-address", "amount": 5 }' "http: //localhost:5000/transactions/new"
After digging the mine twice, there are 3 blocks. You can get all the block information by requesting http://localhost:5000/chain.

Step 4: Consistency (consensus)
We already have a basic blockchain that can accept trading and mining. But the blockchain system should be distributed. Since it is distributed, what do we guarantee to ensure that all nodes have the same chain? This is the consistency problem. If we want to have multiple nodes on the network, we must implement a consistent algorithm.
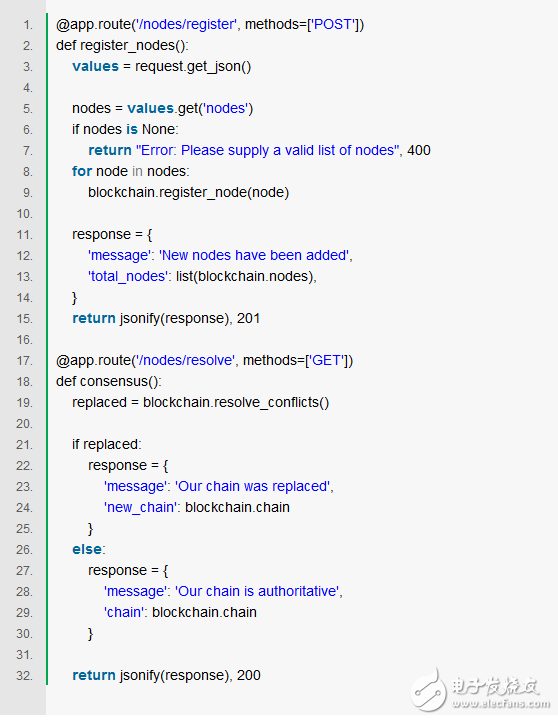
Registration nodeBefore implementing a consensus algorithm, we need to find a way for a node to know its neighbors. Each node needs to keep a record containing other nodes in the network. So let's add a few interfaces:
/nodes/register Receives a list of new nodes in the form of URLs.
/nodes/resolve Executes a consistency algorithm that resolves any conflicts and ensures that the nodes have the correct chain.
We modify the blockchain's init function and provide a registration node method:
Blockchain.py
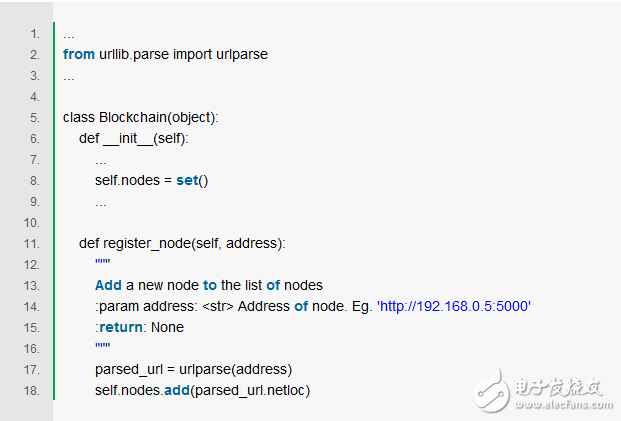
We use set to store nodes, which is an easy way to avoid adding nodes repeatedly.
Consensus algorithmAs mentioned earlier, when a node has a different chain from another node, a conflict occurs. In order to solve this problem, we will formulate the longest effective chain is the most authoritative rule. In other words: the longest chain in this network is the most authoritative. We will use this algorithm to reach a consensus between the nodes in the network.
Blockchain.py
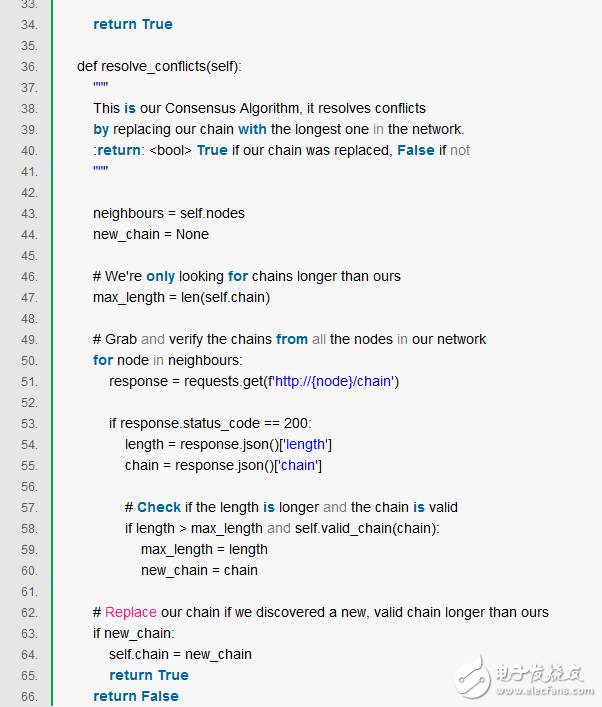
The first method, valid_chain(), is responsible for checking if a chain is valid by traversing each block and verifying the hash and proof.
Resolve_conflicts() is a way to traverse all of our neighbor nodes, download their chains and validate them using the above method. If we find a valid chain with a length greater than ours, we will replace our chain.
We register two endpoints into our API, one for adding neighbors and the other for conflict resolution:
Blockchain.py
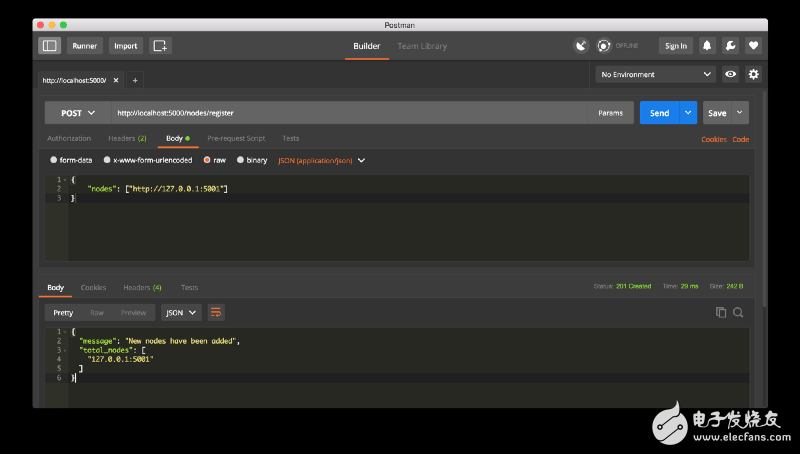
At this point, if you like, you can use a different machine and launch different nodes on your network. Or use a different port on the same machine to start the process. I created another node on my machine, on a different port, and registered it to the current node. Therefore, I have two nodes: http://localhost:5000 and http://localhost:5001. Register a new node:
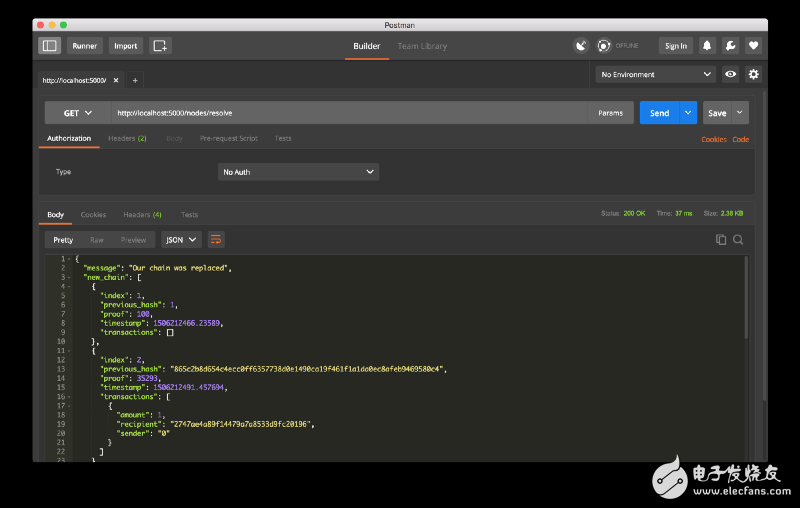
Then I dig some new blocks on node 2 to make sure the chain is longer. After that, I call GET /nodes/resolve on node 1, where the chain is replaced by a consistency algorithm:
This is a package to find some friends to help test your blockchain.
I hope this article will inspire you to create more new things. The reason why I am fascinated by digital currency is because I believe that the blockchain will soon change the way we look at things, including economics, government, and file management.
Lszh Wire,Lszh Grounding Wire,Lsoh Grounding Wire,Lshf Grounding Wire
Baosheng Science&Technology Innovation Co.,Ltd , https://www.bscables.com